3-Technical Installation and Updates
Context and objective
This chapter describes the technical installation of the Yooz connector for Sage X3. The procedure relies on standard Sage X3 functions and applies to current versions of Sage X3 v12. The installation is performed by integrating X3 patches vertically, supplemented by importing JSON files, creating a recurring task, and configuring the SOAP Web Services pool.
This chapter details the operating procedures for:
-
Retrieving the Yooz connector installation technical package.
-
The integration of specific patches in the vertical layer within Sage X3.
-
Creating and activating the Web Services synchronization task.
This document addresses these phases of implementation:
| ▼ | ||||||
|---|---|---|---|---|---|---|
| Pre-sales | Initialization | Framing | Installation | Setting | Recipe | Production launch |
Prerequisites and preparation
Before beginning the technical installation of the connector, it is essential to have generated and integrated the Yooz Serial file into your client's Sage X3 solution (see 0-Obtaining and activating the serial number).
- Necessary rights: Connect to Sage X3 with an ADMIN account or a user with the ERPDEV badge.
- Session language: Default (ENG or FRA).
- System availability: The complete installation takes no more than 3 hours.
Step 1 The deployment (updating standard tables) is the only operation that requires all users to be completely disconnected. The following steps can be performed with active sessions.
Operating procedure
1. Downloading the installation package
- Download the installation file (ZIP file)
📄 Download the installation pack V12
Format :.zip — Taille : 7.1 MB — Version : v1.105- The password for the ZIP file is transmitted with the serial file; if this is not the case, you can contact your Yooz representative.
Versioning
Information regarding the versioning of the Yooz connector for Sage X3 is available in the Release Notes section of the website. This allows you to view the available versions of the connector, as well as information related to any published enhancements, fixes, or updates.
2. Patch integration
Preparing patch files (optional)
This step is optional. It is only necessary if the patches need to be integrated from the Sage X3 application server.
1. Copy the archive retrieved in the previous step into the <PATCH> subdirectory of the target folder X3.
2. Unzip the archive into this directory.
3. Verify that the directories Step1, Step2, Step3, Step4, Json (or Step5 depending on the patch version) and the PatchFiles.xlsx file are present in the package.
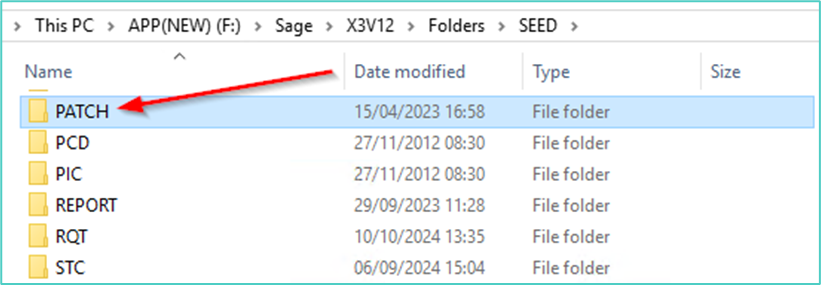
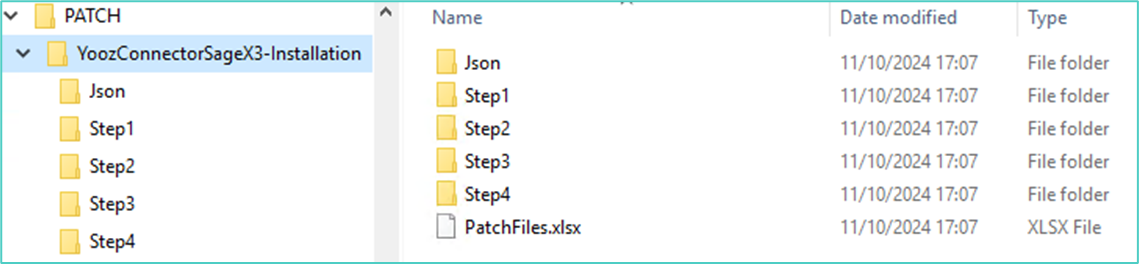
If access to the X3 application server is unavailable, patch integration can be performed using the Client destination type. In this case, the files are integrated one by one from the workstation.
Integration of the first 3 patches
The first three integration steps are carried out from the same Sage X3 function.
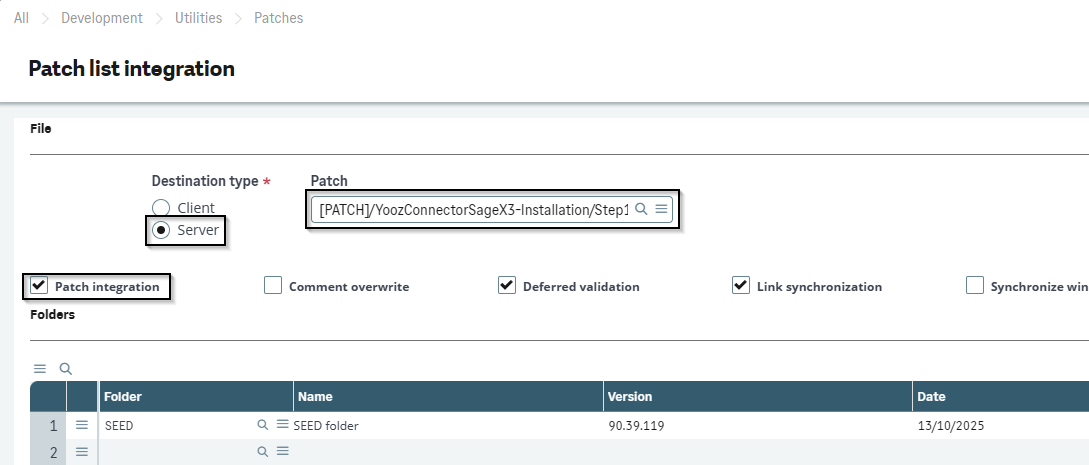
1. Open the Patch Integration function via the menu: Development > Utilities > Patches > Patch Integration (PATCH function)
2. For each step, fill in the field Patch with the corresponding path, then launch the integration.
| Stage | Path to enter in the Patch field | Point of vigilance |
|---|---|---|
| Step1 | [PATCH]/YoozConnectorSageX3-Installation/Step1 | This step updates standard tables. It must absolutely be performed without any active user session. |
| Step2 | [PATCH]/YoozConnectorSageX3-Installation/Step2 | Can be done with active user sessions. |
| Step3 | [PATCH]/YoozConnectorSageX3-Installation/Step3 | Can be done with active user sessions. |
3. Start the patch integration and then wait for the trace to appear before continuing.
The trace must not contain any warnings or errors. If an anomaly is present, it must be analyzed and corrected before continuing the installation.
Step 4 patch integration - Standard object update
Step 4 concerns the updating of standard elements, mainly standard Sage X3 screens.
The PatchFiles.xlsx file, available in the package's documentation directory, allows you to identify the objects affected by Step4.
Two approaches are possible:
Option 1 - integration via patch: This option is preferred when the Sage X3 patch level is compatible with the provided patch.
Option 2 - manual updates: This method is preferred if the Sage X3 solution is not at the latest patch level, or if the standard objects have already been adapted. In this case, the modifications are entered manually from the PatchFiles.xlsx file.
Option 1 - Step4 Patch Integration
1. Open the Patch Integration function via the menu: Development > Utilities > Patches > Patch Integration (PATCH function)
2. Fill in the field Patch such as [PATCH]/YoozConnectorSageX3-Installation/Step4
3. Start the patch integration and then wait for the trace to appear before continuing.
The trace must not contain any warnings or errors. If an anomaly is present, it must be analyzed and corrected before continuing the installation.
Option 2 - Manual updates
1. Do not integrate the Step4 patch into Sage X3.
2. Open the PatchFiles.xlsx file and manually apply the listed modifications to the objects checked in Step4.
3. After entering the changes, validate the objects concerned and check that no validation errors are present.
The codes for the connector buttons added to the standard windows do not matter. If the default code is already in use for another button in your application, you can use a different code. You can find more information about the buttons to create in the YoozConnectorX3-PatchFiles.xlsx file located in the Documentation folder of the installation package.
3. Importing JSON files
This step can be performed at any time, with active user sessions.
Open the import wizard via the menu: Administration > Utilities > Imports > Import Tools
1. Select the JSON file Client option.
2. Click on Select file.
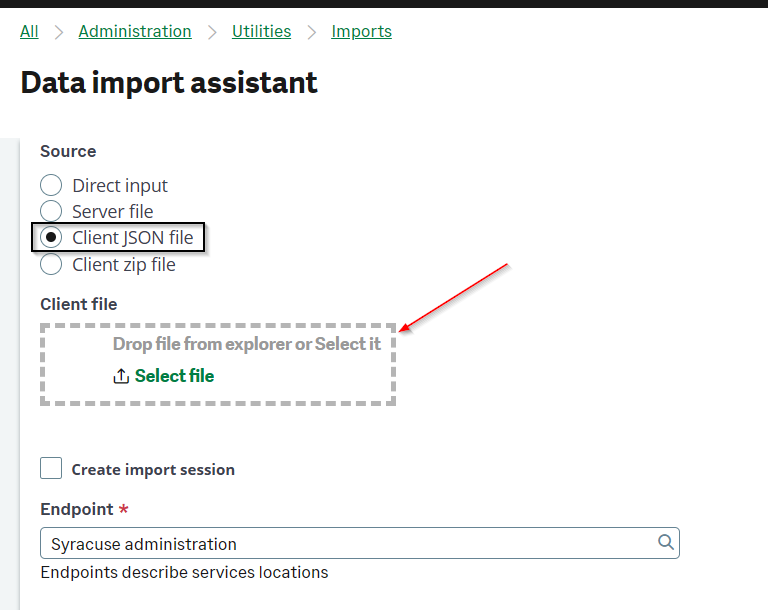
3. Select a JSON file from the directory Json of the installation package. Depending on the package used, the directory may also be specified as Step5.
4. Repeat the operation for each JSON file to be imported.
5. Reconnect to Sage X3 after the import. The new Yooz menus will then become available. They can be found by entering Yooz in the menu search bar.
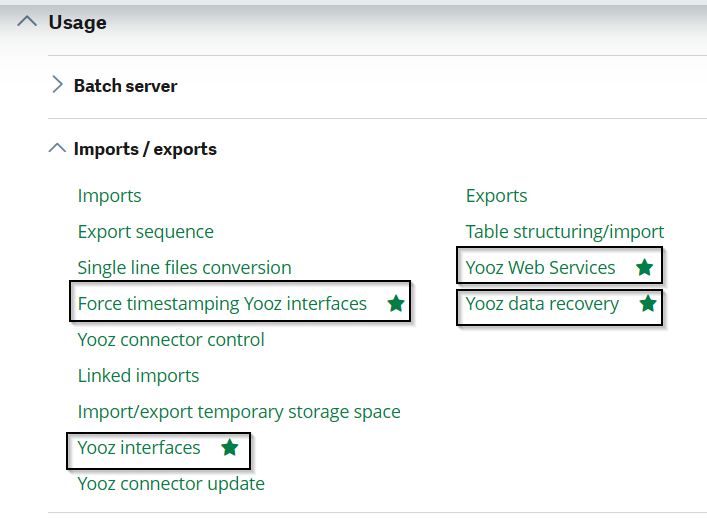
4. Creating the recurring task XRJ31EXE
The task and the recurring task are not delivered via patch, as this data is stored in the X3 folder. This task automates the synchronization processes of the Yooz X3 connector, ensuring regular exchanges between Sage X3 and Yooz via Web Services.
-
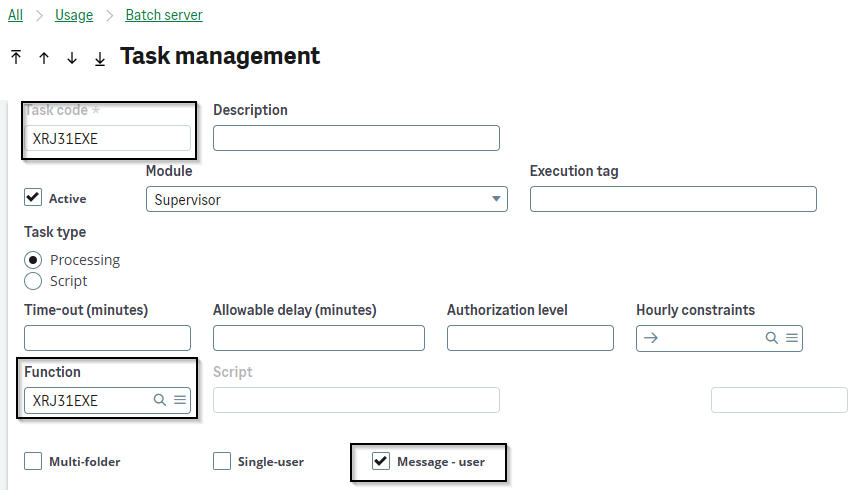
First, create the batch task in the function: Usage > Batch Server > Task Management (GESABT function)
-
Create an XRJ31EXE code task, based on the XRJ31EXE function.
-
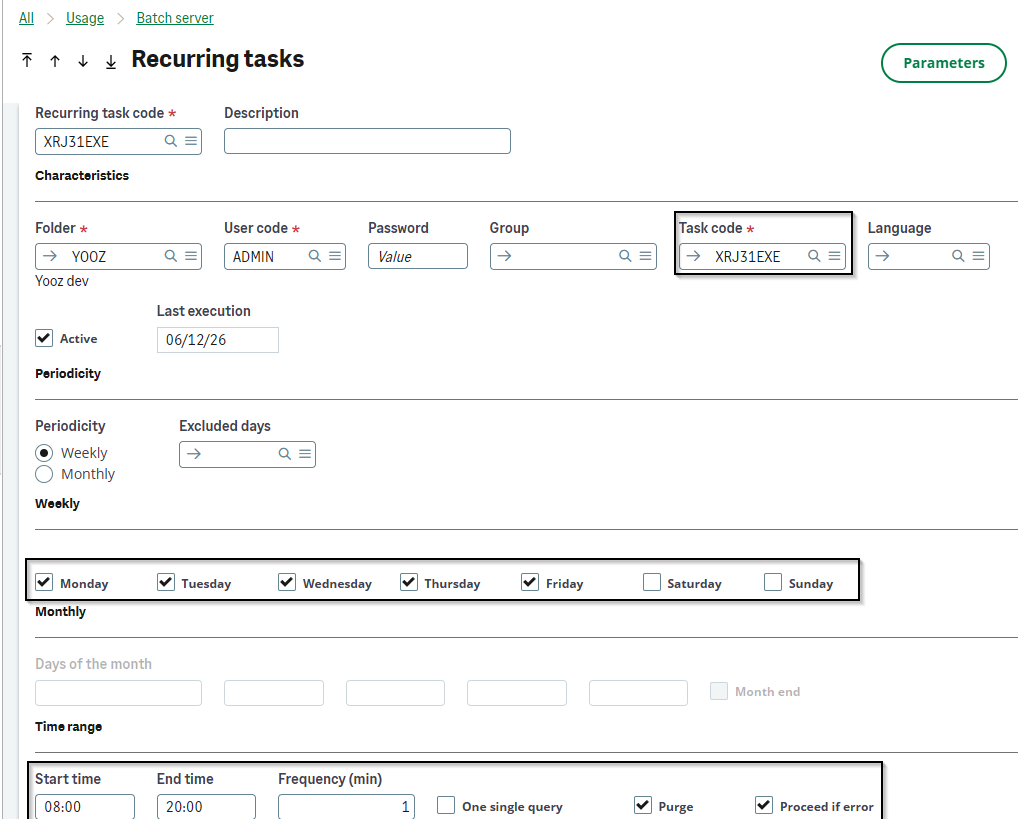
Next, create the recurring task: Usage > Batch Server > Recurring Task Management (GESABA function)
-
Create a recurring task based on the XRJ31EXE task. It must be scheduled with a high frequency to maintain good synchronization between Sage X3 and Yooz.
- Click the Settings button and check the boxes next to the items you want to sync. If you need to change these settings later, you’ll need to disable and then re-enable the subscription.
Before enabling the subscription (checking the “Active” box), you must coordinate with the project team or the functional K-users.
5. Configuring the Yooz user (in the Administration and Configuration modules)
This step prepares the technical account used by the connector and by the Web Services calls. The account must be available in the Sage X3 / Syracuse administration interface and linked to the correct endpoint.
1. Open Administration > Administration > Users.
2. Create or control the Yooz technical user account intended for the connector.
3. Specify the necessary endpoints. The user must be able to access the relevant X3 folder.
4. Add the necessary groups and roles according to the client's authorization policy.
5. Verify that the account is active and that the password is known when creating the Web Services pool.
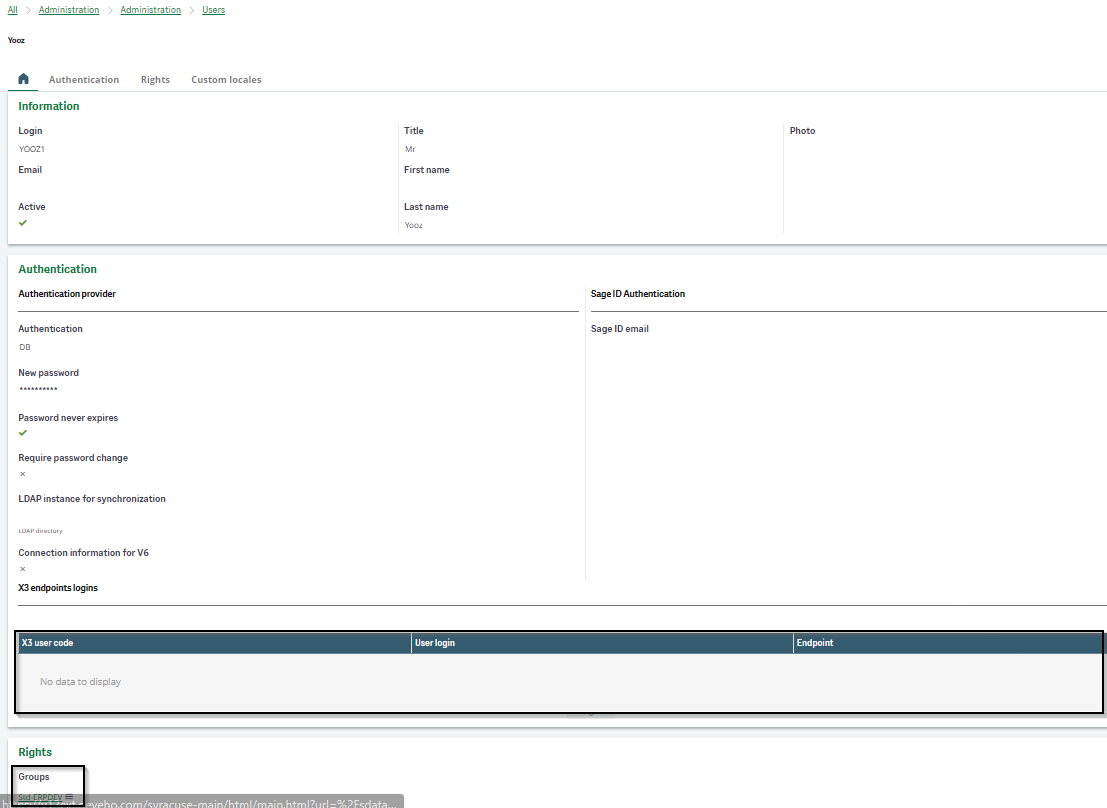
The technical user account used by the SOAP pool must be stable. Avoid using named accounts, as user deactivation or password changes can disrupt Yooz to Sage X3 data flows.
The Yooz user must also be controlled in the X3 parameter functions. It is used in object properties when returning or importing from the Yooz application.
1. Open Setup > Users > Users (GESAUS function).
2. Create or control the YOOZ user used by the connector.
3. Add the workflow email address when the project plans to send notifications or traces.
4. Control X3 authorizations, access to the folder and the necessary rights on the objects processed by the connector.
5. Save and then validate the user if the function requires it.
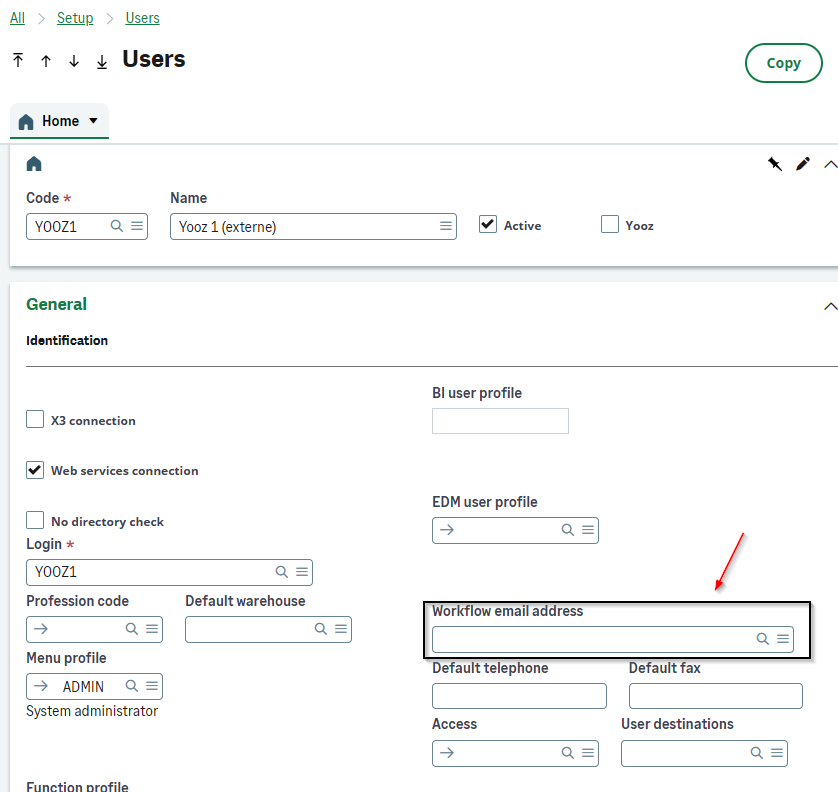
NOTE: The Yooz user must have consistent permissions across Syracuse administration, the X3 setup, and the Web Services pool. Discrepancies in permissions between these three levels are a frequent cause of connection errors or failed processes.
6. Creation of the Yooz SOAP Web Services Pool
The SOAP Web Services pool allows Yooz to call Sage X3 Web Services. This is the technical point used by incoming flows from Yooz to X3, particularly for imports or returns managed by the connector.
Open the function: Administration > Administration > Web services.
1. Add the endpoint corresponding to the relevant Sage X3 folder.
2. Add a user with the necessary rights. The user must be the one prepared in the previous steps or an equivalent technical account.
3. Create a pool per endpoint. When multiple folders or endpoints are exposed, each must have its own pool.
4. Provide an explicit pool alias. This alias is communicated to Yooz along with the associated password.
5. Verify that the pool user has sufficient rights to run the services required by the connector.
6. Save the pool configuration and verify that no errors are reported in the administration.
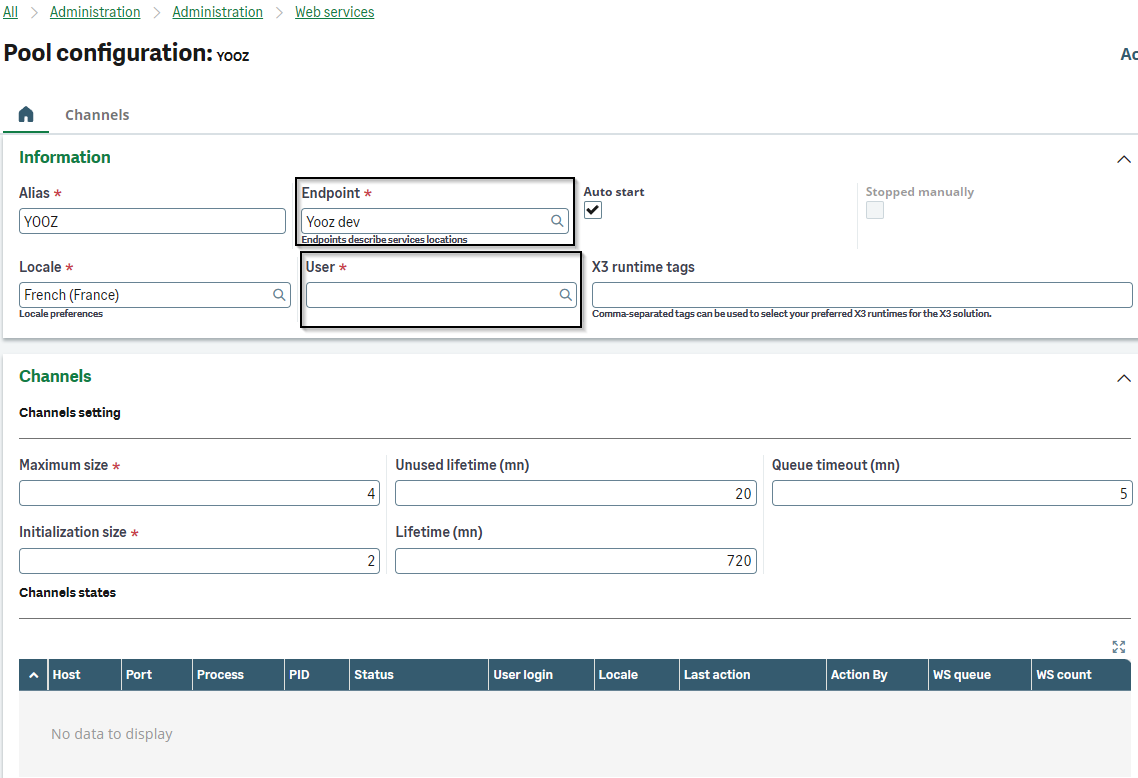
After creating the pool, perform a global publication from the GESAWE function of all AOWS* Web Services. This publication makes the necessary Web Services available for SOAP calls from the connector.
1. Open the Development > Script dictionary > Scripts > Web services (GESAWE function)
2. Filter AOWS* Web Services.
3. Launch the global publication.
4. Check that the publication is completed without errors.
Provide Yooz with only the necessary information: the published SOAP URL, the pool alias code, and the associated password. Do not send any screenshots containing visible secrets or passwords.
NOTE: The SOAP path expected by Yooz must be accessible from the outside according to the validated architecture: /soap-generic/syracuse/collaboration/syracuse/CAdxWebServiceXmlCC. When access is via a reverse proxy, verify that this path is correctly routed to Sage X3.
7. Added the YOOZ badge to Roles
The YOOZ badge is created during serial integration. It must be added to the roles of users who use the connector, as well as to the role used by the technical account or the batch server.
1. Open Administration > Users > Roles.
2. Identify the roles used by users of the Yooz X3 connector.
3. Add the YOOZ badge to the relevant roles.
4. Also add the YOOZ badge to the role assigned to the account used by the batch server and/or the Web Services pool.
5. Request users to reconnect if necessary so that the new rights are taken into account.
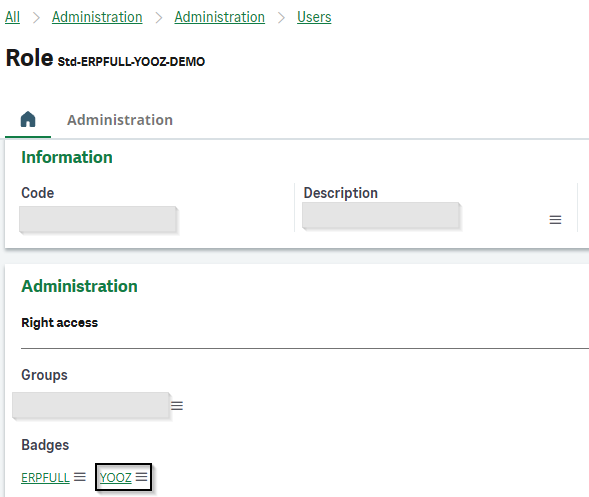
Don't forget the role of the batch server. If the YOOZ badge is not assigned to the account running XRJ31EXE, automated processes may fail even if interactive users have the necessary rights.
8. Additional Step: Hotfix Patch
The installation package may contain a Hotfix subdirectory. This step is only necessary if files are present in this directory.
1. Check the Hotfix directory in the package.
2. If it contains files, open the Patch Integration function: Development > Utilities > Patches > Patch Integration (PATCH function).
3. Fill in the Patch field with the path [PATCH]/YoozConnectorSageX3-Installation/Hotfix.
4. Start the patch integration, then wait for the trace to appear before continuing.
5. Analyze the trace. It should not contain any warnings or errors.
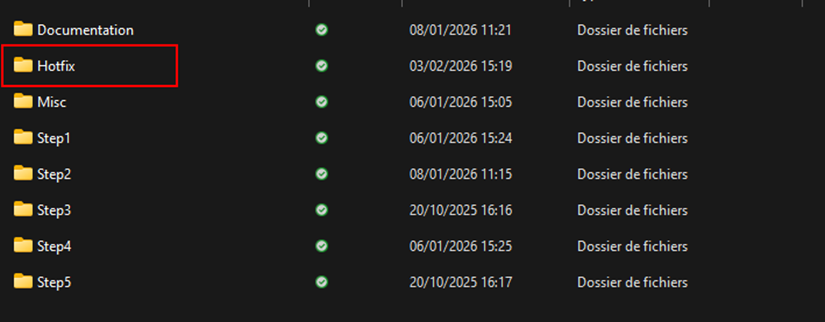
NOTE: The Hotfix stage follows the same logic as the Step2 or Step3 patches: integrate, wait for the trace, then address any anomalies before proceeding.
9. Yooz connection technical parameters
The authentication method available with Yooz is based on Client ID/Client Secret. The Yooz team must authorize Deveho as a partner, define the necessary permissions in the Yooz application, and provide the project with the required credentials.
9.1 Connection settings
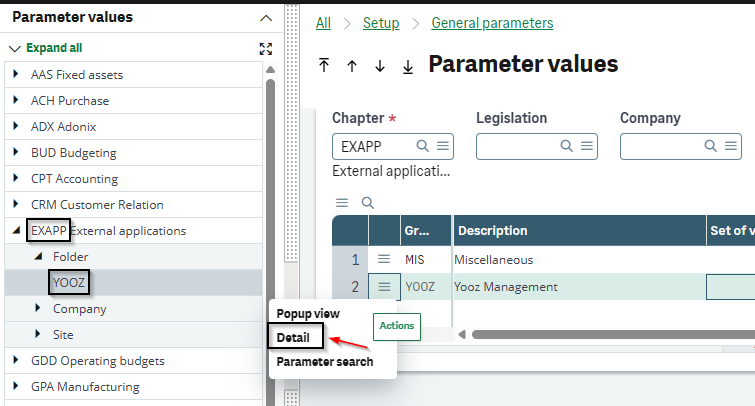
Open the function: Setup > General parameters > Parameter values (ADPVAL function), EXAPP chapter, YOOZ group.
| Setting | Role / Use | Vigilance |
|---|---|---|
| XRJ31APPID | Identifier of the Yooz application called by Sage X3. | Value provided by PM Yooz. Mandatory. |
| XRJ31CLIID | Client identifier used for API / OAuth authentication. | If incorrect: authentication refused. |
| XRJ31CLISC | Client secret used with Client ID. | Confidential data not to be displayed in screenshots. |
| XRJ31URLDO | Yooz URL of the target environment: test, pre-production or production. | Verify that the URL matches the provided credentials. |
| XRJ31TIMZO | Time zone used in trade, e.g. Europe/Paris. | If incorrect: risk of date/time discrepancies. |
| XRJ31USRLA | Language used in exchanges, e.g. fr or en. | If incorrect: unexpected language on Yooz's side. |
Before any flow test, verify that the Yooz URL, Application ID, Client ID, and Client Secret correspond to the same environment. Mixing test and production values can send data to the wrong environment.
9.2 Options Curl and configuration proxy
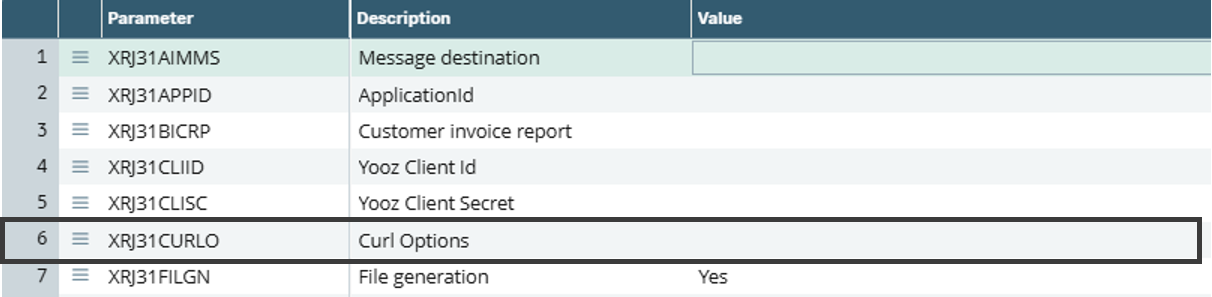
When sending certain documents, such as purchase orders or receipts, the connector uses a Curl command to communicate with Yooz. The XRJ31CURLO parameter allows you to add technical options to the request.
1. Open Setup > General parameters > Parameter Values (EXAPP chapter, YOOZ group).
2. Specify the XRJ31CURLO parameter only if a technical option is required.
3. In the case of a network protected by a proxy, use an option of type: -x <[protocol://][user:password@]proxyhost[:port]>.
4. Test sending a document after modification to check that the proxy or the added option does not block the Yooz call.
Do not configure the Curl option without validation from the infrastructure team. An incorrect option can block all outgoing REST traffic to Yooz.
9.3 Managing two Yooz applications on the same X3 environment
When the same X3 environment has multiple folders, for example a test folder and a production folder, it may be necessary to manage two separate Yooz applications from the same technical environment.
1. Open Administration > Administration > Web services > Rest web services.
2. Duplicate the two REST Web Services with new code when the project requires two Yooz applications.
3. Next, enter the dedicated parameter values in Setup > General parameters > Parameter Values (EXAPP chapter, YOOZ group).
4. Use XRJ31RESTT and XRJ31RESTY to specify the REST Web Services codes to use for the Yooz add-on application.
5. If the Sage X3 environments are physically or technically separated, these specific settings are generally not necessary.


When two Yooz applications need to be fed from the same X3 folder, check XRJ31RESTT and XRJ31RESTY before repository restarts and before activating XRJ31EXE.
10. Automatic connector update procedure (XRJ31UPD)
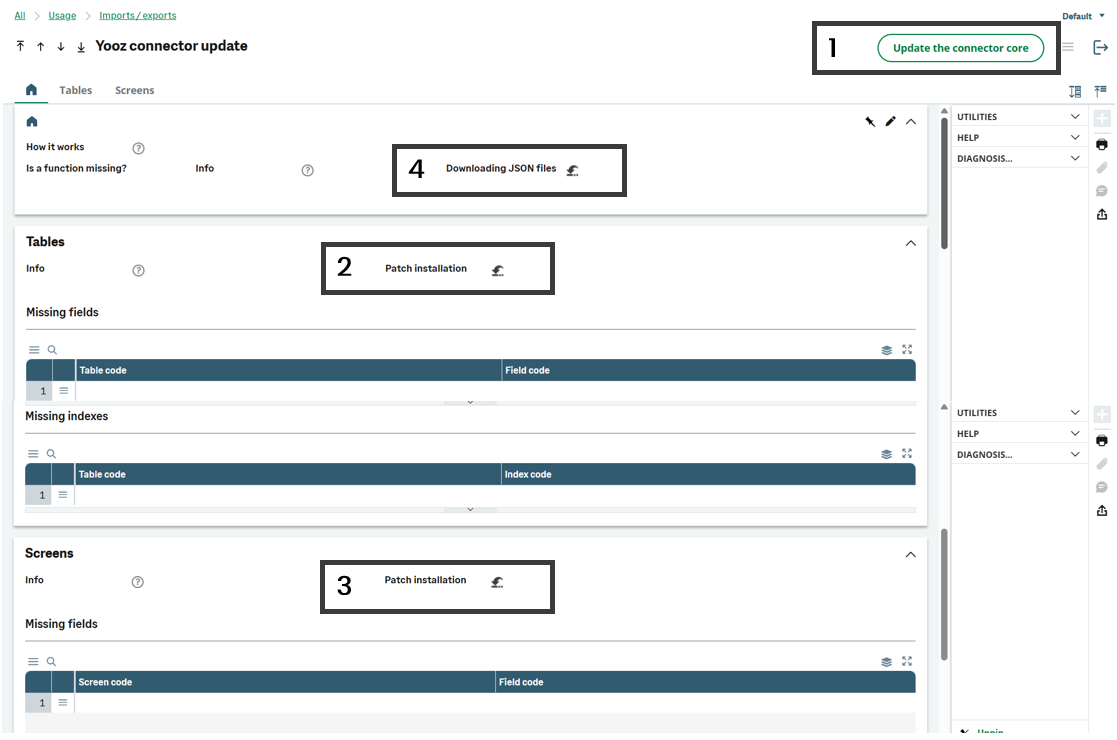
The Yooz connector update function allows you to update the connector from Sage X3. It should be used when the target version of the connector requires an update of the connector core, certain technical fields, indexes, standard screens or additional functions.
Open the function: Usage > Imports / exports > Yooz connector update (XRJ31UPD function).
-
Update the specific core of the Yooz X3 connector.
-
Add missing fields and indexes to standard tables when the target version requires it.
-
Add the necessary fields to the relevant standard screens.
-
Add the additional features delivered in the target version: Import the JSON files associated with the new version via Administration > Utilities > Imports > Import Tools.
NOTE: If the client does not wish to patch the standard elements, manually apply the modifications described in the PatchFiles.xlsx file.
11. Additional parameter on the Yooz side
An additional step may be required in the Yooz application, particularly for payment returns to Sage X3.
1. Open the Yooz application with a user who has the necessary administrative rights.
2. Access the Advanced parameters section.
3. Check the parameter relating to the re-importing of a file with the same checksum.
4. Set the parameter to Off when the Yooz payment return flow to Sage X3 requires it.
5. Validate the change with the Yooz project manager before launching payment feedback tests.
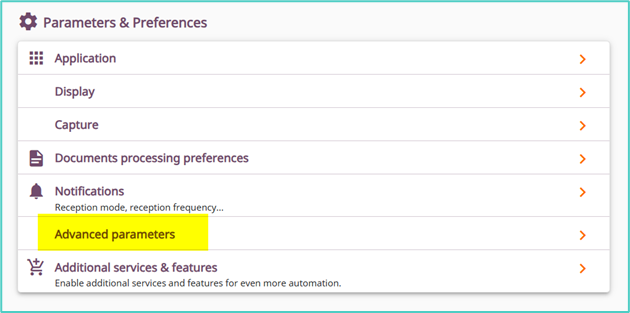
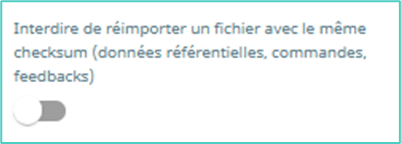
This setting is on the Yooz side. It should only be modified when the project workflow requires it and after validation by the Yooz team.